Monday 6 October 2014

Sesame Dressing / Dipping Sauce - By Stacey

This dressing is the BOMB!

If you love sesame then this will be the type of dressing you will crave. I used to have it all the time in Japan and completely took it for granted. I could buy it ready made at the supermarket and it was almost always on salads in restaurants it was just a normal part of my life. But since moving back and not living near an asian food store I've had an empty spot on my salad. So I started to search for the perfect recipe and experiment until I can finally say this is the ONE! 

Ingredients 
2~3 Tablespoons Sesame seeds 
11/2 Tablespoons Kewpie Mayonaise 
1 Tablespoon [Sushi] Rice Wine Vinegar
1/2 Tablespoon Soy Sauce
1/2 Teaspoon Sesame oil 
1/4 Teaspoon Mirin
pinch to taste of white pepper - (not pictured sorry I forgot)

Step 1 
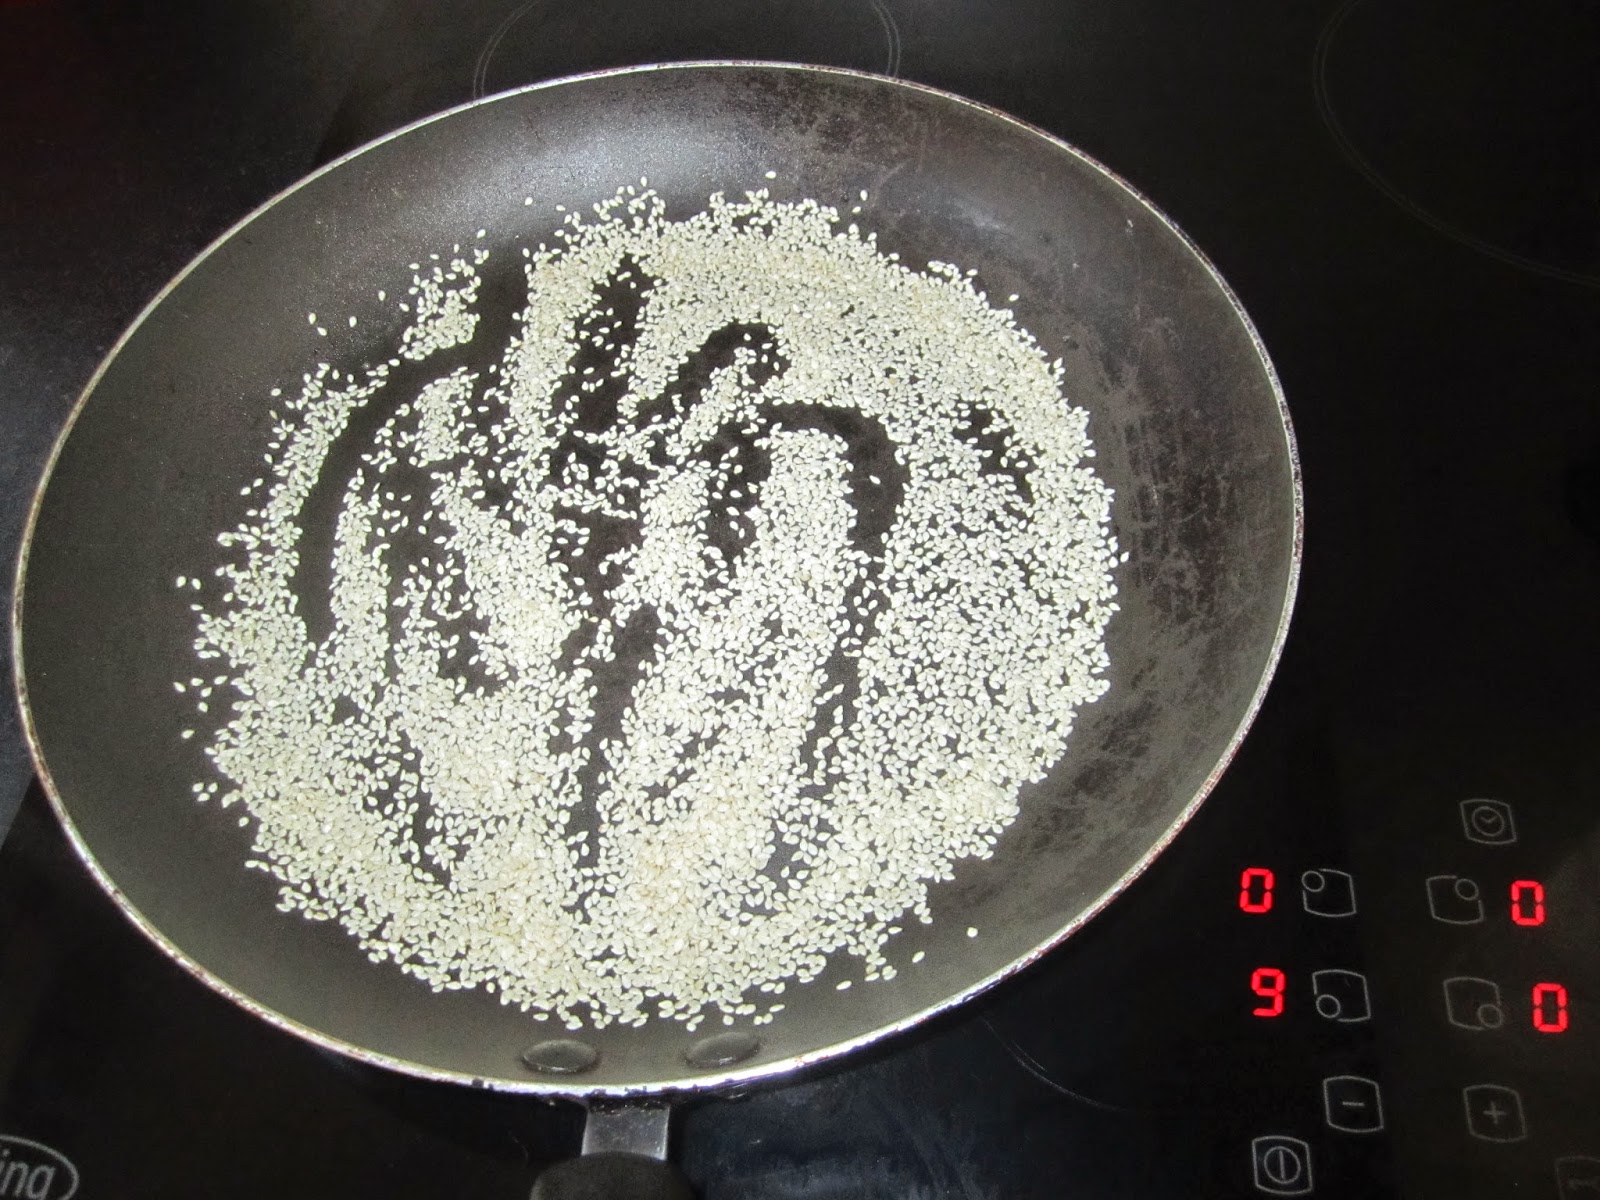
Dry roast sesame seeds in a fry pan with no oil until the seeds start to slightly colour and smell delicious. 


Step 2
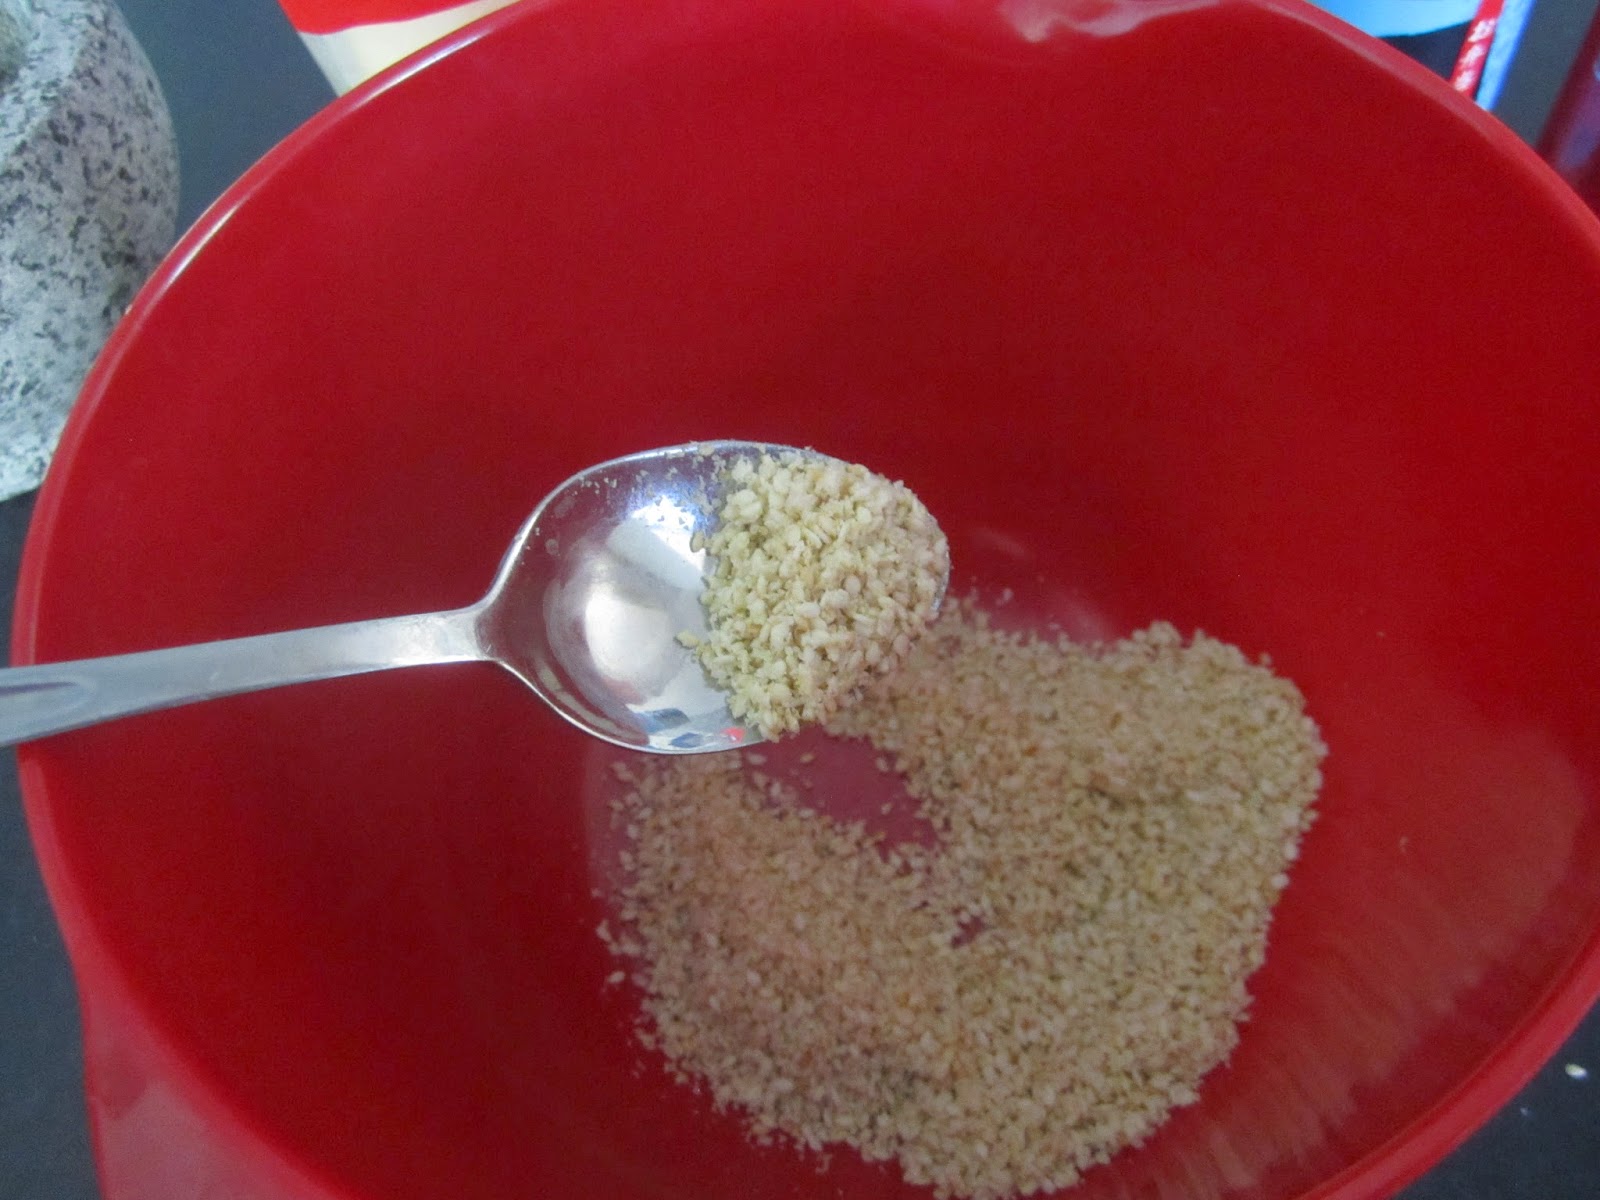
Crush up the roasted sesame seeds in a mortar - do leave some whole though


Step 3
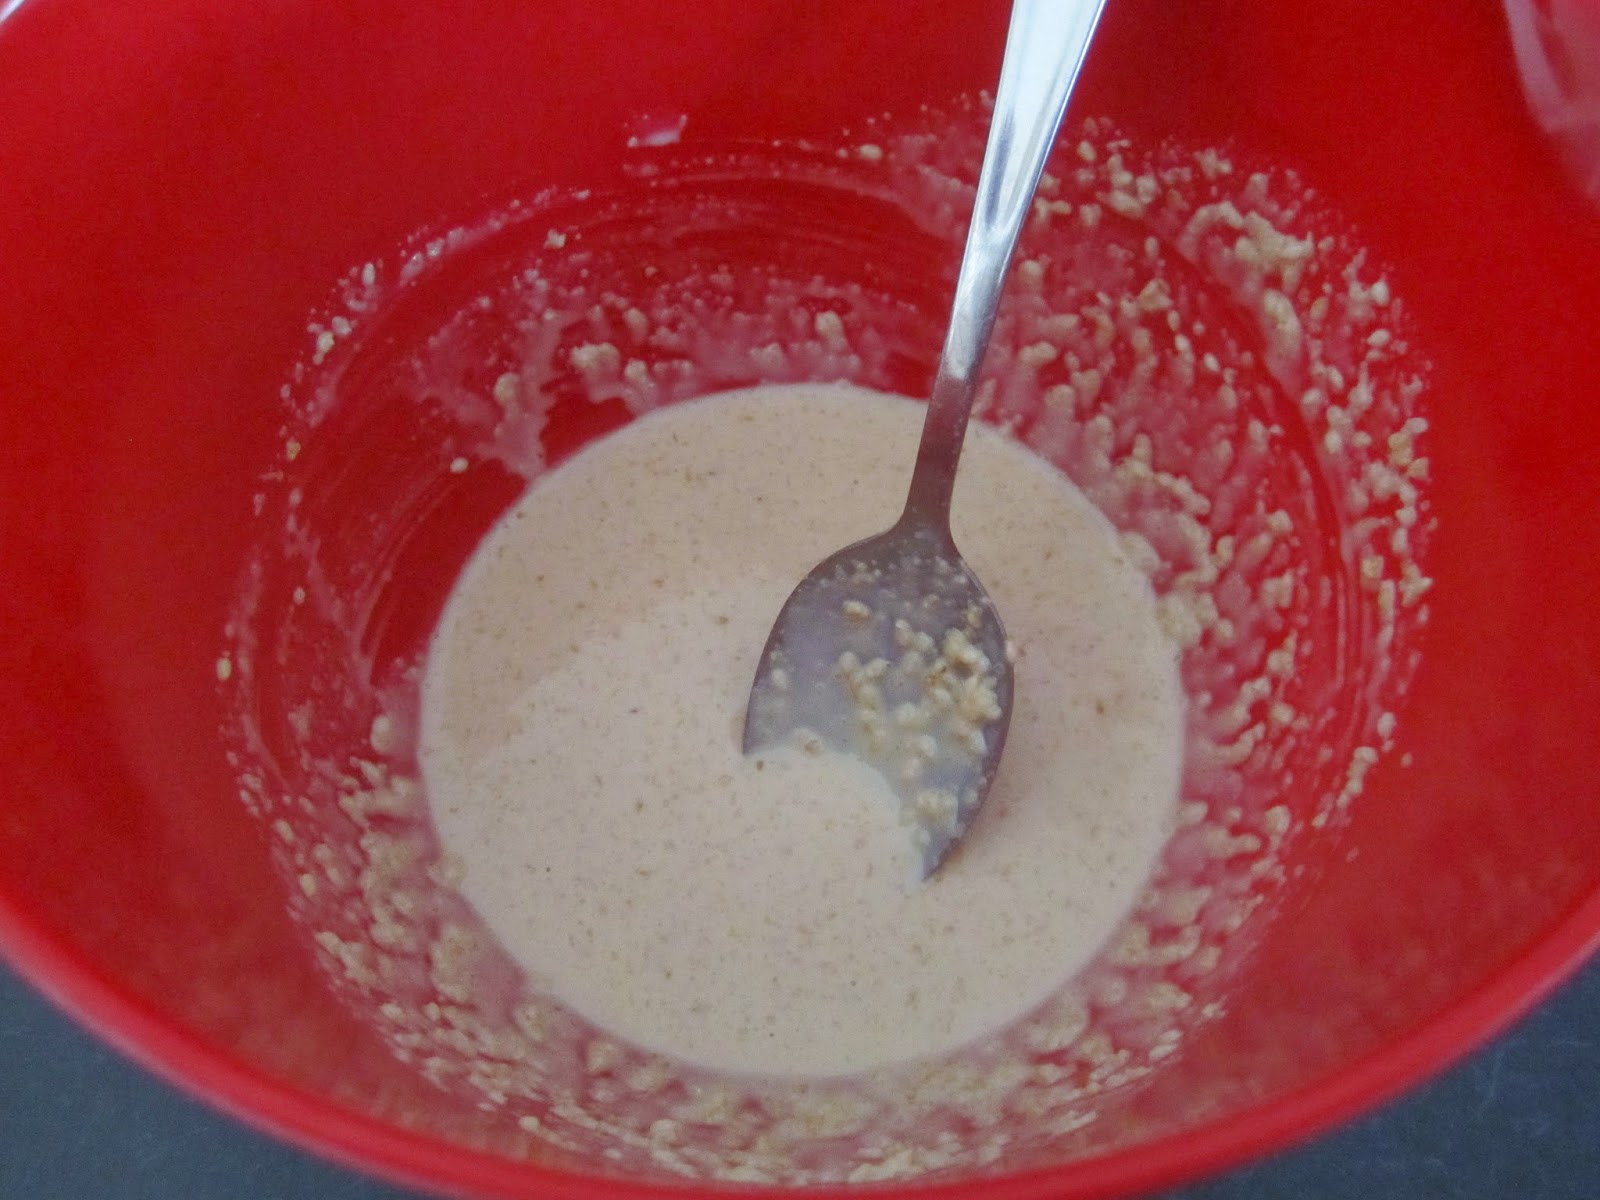
Mix all ingredients together and serve on your favourite salad or over chicken, rice, tofu the list goes on. 


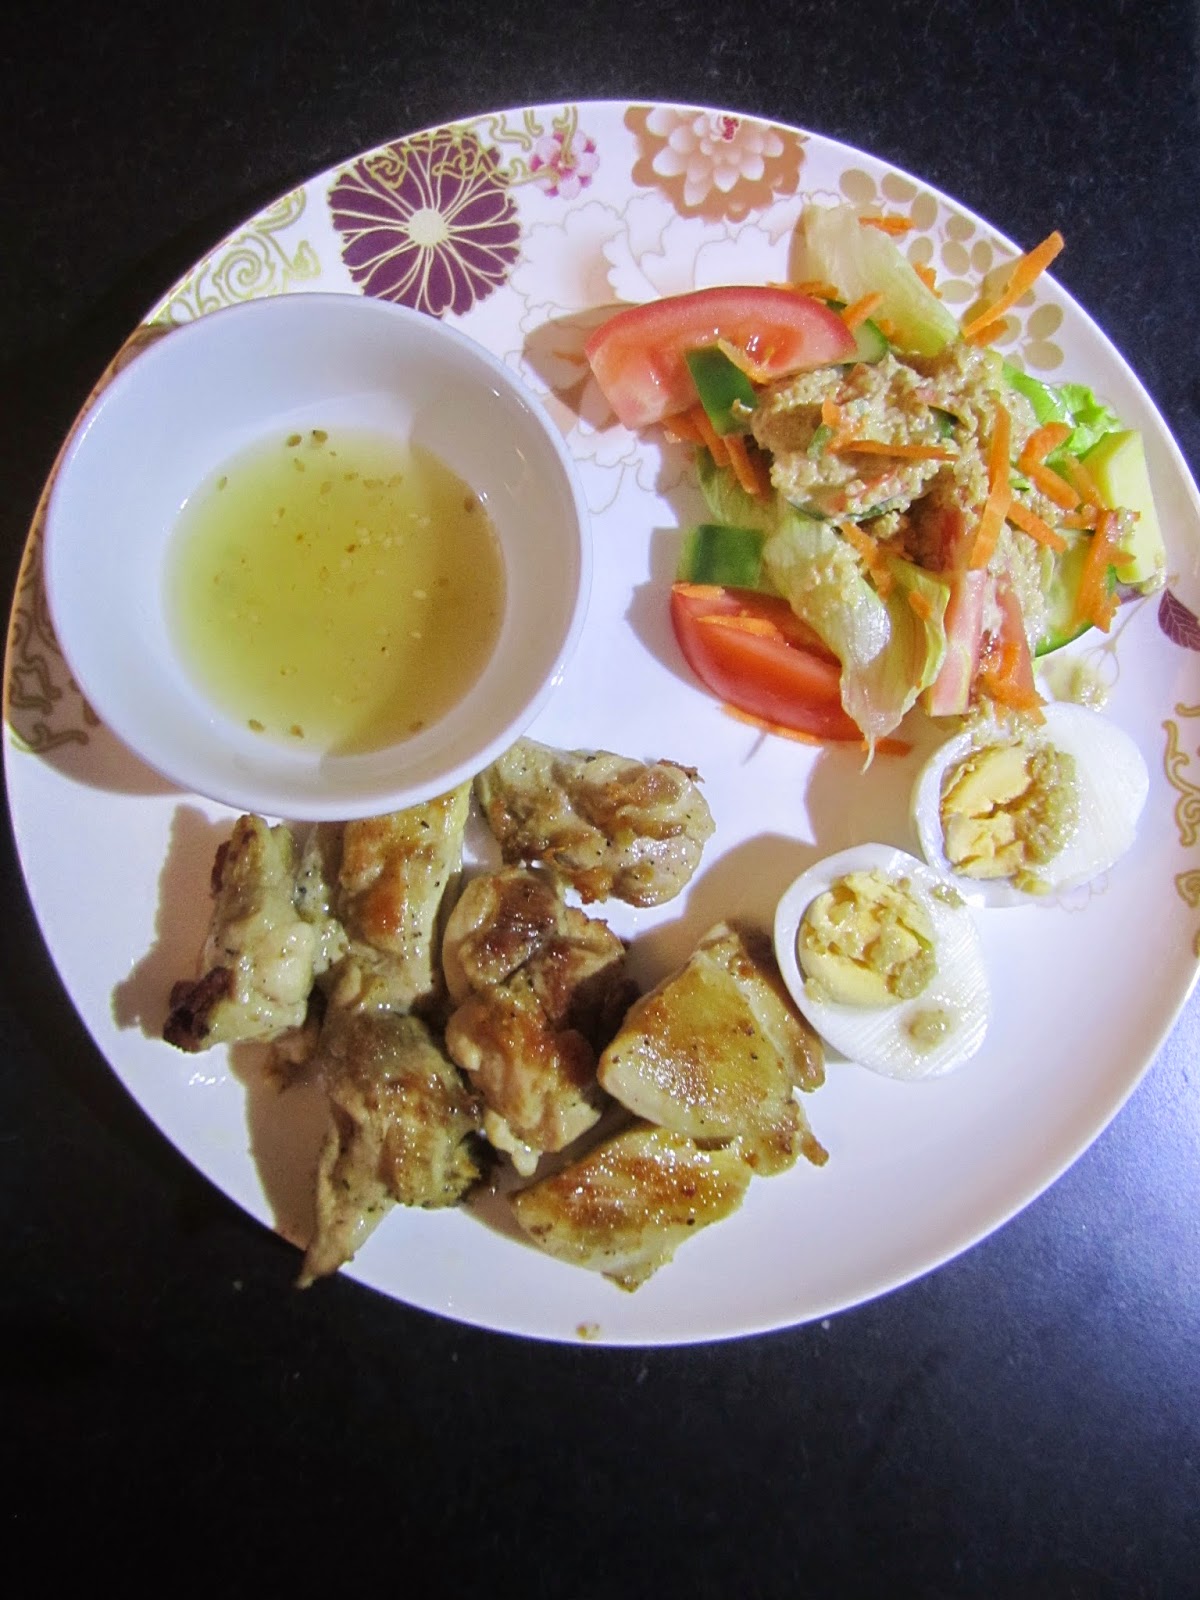
I served my Sesame Dressing over a simple salad
and had grilled chicken pieces with a dipping sauce.
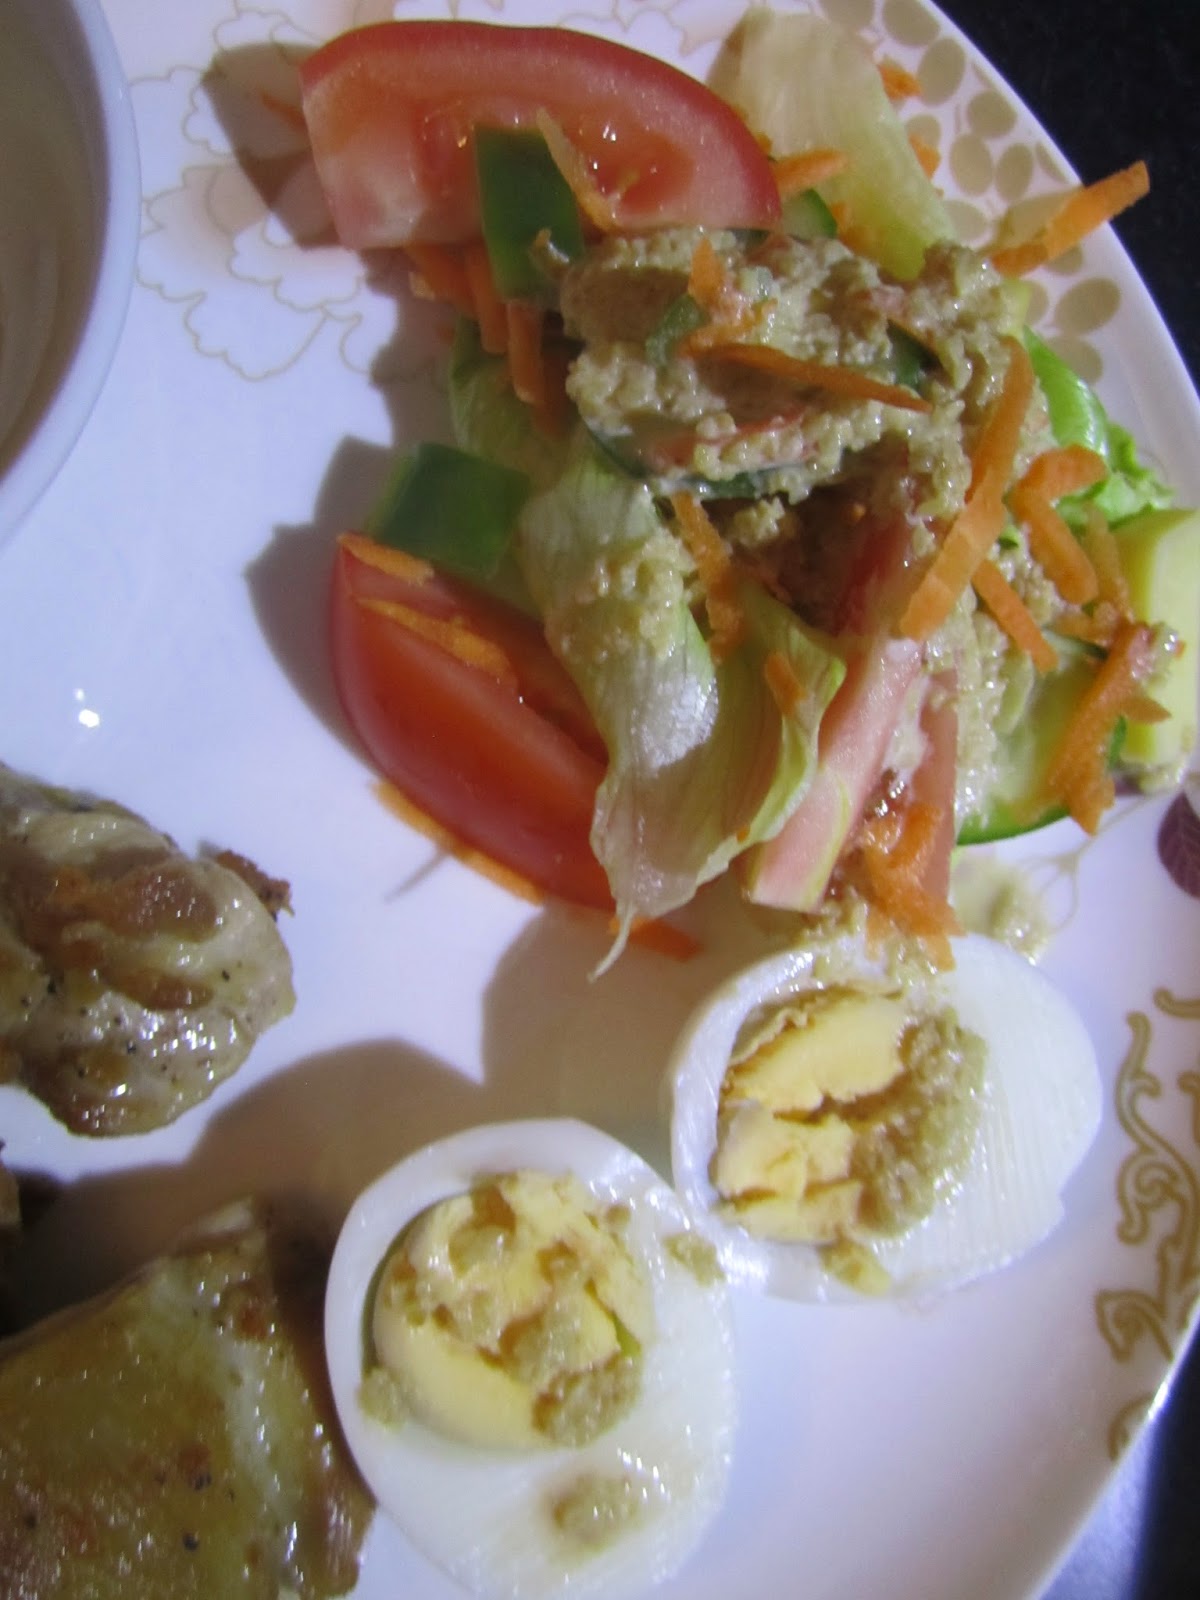
Delicious!!!!

Thursday 2 October 2014

Roast Lamb Pies - Pie Maker- By Stacey

We all love a kitchen appliance until it gets delegated to the back of the cupboard and never heard from again. 

When I was given my pie maker I was pie crazy I made every kind of pie breakfast pies, left overs pies, sweet pies, potato pies, egg pies, spaghetti pies and well you get the gist. 

This week after a year long vacation to the back of the cupboard the pie maker was out and about with my brand new invention " The Roast Lamb Pie" 

I had the inspiration for this pie when at the supermarket I came across very cheap lamb meat - stewing cuts very boney but the price was right. 

I decided to put these in the slow cooker and use roast lamb flavours so I tossed the meat in flour first  then added cut up 500g potatoes (add other veggies too such as carrot, pumpkin parsnip), 1 brown onion, splash of red wine, crushed garlic, chopped rosemary, tablespoon tomato paste, 1 table spoons of beef stock & 2 cups water salt and pepper to taste- cook on low for about 7 hours. 
(Now there is a school of thought that when you use the slow cooker or roast meat you should brown all meat first in a fry pan...pfft forget that it basically takes the whole convenience away from the process. So no I never brown my meat or fry off my recipes first and its never failed me. So I leave it up to your own preference and time wasting ability weather to brown off first). 


Then as per pie maker instructions -short crust pastry at the bottom and puff pastry at top - If you don't have a pie maker just at this stage use a pie tin and do it in the oven instead. 


mouth watering Lamb Roast Pie

I think my next test flavour pie will be the lamb Greek roast flavour pie

....mmmm yum stay tuned

Wednesday 13 August 2014

Crafts in Japan & Washi tape obsession & Tokyu Hands & Loft stores - by Stacey

I've just returned from 16 sensational days in Tokyo. I actually lived in Japan for about 9 years in what seems like another life, so going there on holiday is the best of both worlds its like returning home and being a tourist with all the insider secrets all at once. Luckily for me I introduced my husband to it a few years ago and he loves it there too- maybe even more than I do which is saying something. 


Iconic multiple crossing at Shibuya


Harajuku all the shops
are so super cute

Masks on display at Asakusa Senso-ji

The best Yakiniku at Blackhole in Shinjuku

Just skip lunch & go
straight for dessert

Me & a light ramen lunch
nom nom nom

CRAFTY SHOPPING

If you are ever in Japan its a craft persons paradise and I highly recommend you check out Tokyu Hands (Tokyo stores maps here). and Loft. Both stores are so full of fun crazy colourful happy happy joy things you can spend hours roaming around and the craft sections in particular are inspirational if they don't get your craft juices flowing then nothing will. 

Another great place to pick up cheap and very fabulous craft things are the 100 yen shops my TOP 2 are the 4 story Daiso in Harajuku you can't miss it on the main strip go on a Sunday and check out all the people dressed in cosplay costumes its a sight to behold. Or there is a Can Do 100 yen shop (my personal favourite) on the top store at the plaza at Shinjuku Prince. 

A really fabulous crafty guru to check out in Japan is Hello Sandwich her blog is here.

Some of my awesome craft loot from Japan
Now as you can see from the loot photo I have a small obsession with washi tape its just so pretty and the possibilities are endless. Don't worry I have full control of this addiction I'm self medicating with daily Pinterest trawling. My only worry at this stage is that I didn't buy enough! 


How cute are these little washi tape pegs
Stay Tuned for more washi tape fun  

Monday 9 June 2014

Cookie Stamps - Orange Cookies- By Stacey

Just wanted to share this I used cookie stamps today for the first time and they are so fun and really make the cookie classy! 
I made these orange flavoured cookies as I had a couple of oranges I needed to use. These are quite subtle sort of vanilla cookies with an orange infusion very lovely and really quick and simple. I think next time instead of decorating with white chocolate I will add white chocolate chunks to the dough. 


Orange Biscuit Recipe

2 & 1/2 cups plain flower 
1 tsp baking powder 
1/4 tsp salt 
1 egg
1 cup sugar
125g butter 
orange rind of 2 oranges 
3 tbls fresh orange juice 
white chocolate melted

Heres How
Preheat oven 180 and line backing trays with baking paper
Step 1 - Rub the orange rind through the sugar with your fingers. 
Step 2 - Using beaters cream butter and your orange sugar until fluffy 
Step 3 - Add the egg and juice and keep mixing 
Step 4 - Combine dry ingredients and slowly add to wet ingredients 
Step 5 - With your hands bring the dough together and either shape into balls and slightly flatten or roll them out and use a cup or cookie cutter - this is when I stamped them. 
Step 6 - Bake for 10 minutes until just changing colour to light golden 
Step - 7 - Allow to cool completely and then decorate with melted white chocolate. 

Friday 30 May 2014

Easy Special Fried Rice - by Stacey

Who doesn't love fried rice its so versatile you can cook it with all your favourite things or throw together what ever you have at the time.  

This is my delicious version of fried rice that you really can add anything to I make mine the day after a roast pork as I use the left over in my recipe. This will serve 4 people and all up takes 15 ~20 minute max.  


Ingredients;
4 ~5 cups cooked rice - I use my rice cooker and start with 3 cups of uncooked rice.
3~4 bacon stips 
3 eggs - made into a sloppy fluffy omelette
1 chorizo sausage or the chinese lap chong sausage 
1 cup chopped left over roast pork or roast chicken
1/2 green capsicum
1/2 carrot
1/2 cup frozen peas 
2 spring onions finely slices - or 1/2 brown onion
1/2 cup oil 
1 tsp chicken stock powder
1 tsp white pepper
1 tsp rock salt 
1 tsp soy sauce 
1 tsp sesame oil

Not used today (as I had none) but I do often use bean sprouts and cooked prawns which i add right at the end with the omelette...Don't worry I'll remind you again then.

Now fried rice in my opinion is mostly about the order you throw things in over a high heat. Use a large wok or really large frypan and keep tossing it.

Here is how I do it. 

Step 1 - cook rice & chop up all your stuff in small even cubes 


Step 2 - make an omelette so its still runny then put it aside chopped up roughly. 


Step 3 - Fry bacon and sausage in oil now it might seem like a lot of oil but it will be needed to coat and lubricate the rice. (If you are using a brown onion add this now too)


Step 4 - add carrot and capsicum toss around for a few minutes you don't want them mushy


Step 5 - Add rice and toss it all through I use a spatular as my cooking tool 


Step 6 - add flavourings salt, pepper, stock, soy sauce & sesame oil - you might need more salt and pepper to taste just see how you like it. Toss through at this stage you aren't cooking your just tossing through and its a fast process over a high heat. 

Step 7 - chuck in omelette, roast meat, spring onion and peas (if using cooked prawns and bean sprouts add at this stage) toss through 2~3 minutes and remember to taste - season more if needed. 


Step 8 - Eat it 


Or try serving it a bit different by putting it in a small bowl then flip it on an asian style plate ... so fancy! 


Tuesday 27 May 2014

Veggie Garden Signs - By Stacey

This is not really a how to post, I just wanted to share with you a couple little signs i made on the weekend for my up and coming veggie garden.


Painted with Acrylic paint on to smooth rocks then top coat with gloss exterior varnish


Used a stensil to trace the letters then painted with acrylic paint and 4 top coats front and back with gloss exterior varnish , drilled holes and used twine to make a hanger handle thingy
My favourite thing right now gloss exterior varnish will help weather proof 

Wednesday 7 May 2014

DIY Wallpaper Makeover Cupboard Doors - By Stacey

Cupboard Doors Makeover 

I decided to spruce up our linen cupboard doors they were very old scratched and stained laminate and the quote to replace the doors alone was over $2000. Which I'd prefer to spend on a holiday at the moment. 

The makeover was really easy and so cheap the hardest part was getting the doors back on I needed help, there was a fair bit of swearing and grunting from the hubby.

I chose a very simple white textured paper as the hall is small and white and my hubby wasn't completely sold with the idea - no creative trust I tell you! If it was in a bedroom or a study I'd use a beautiful bold pattern so its a feature.

First I gave the metal edges a quick coat of spray paint I just used satin white but any accent or contrast colour or gloss would look most excellent.

Before this photo doesn't highlight the ugliness very well but trust me it was awful.
here's what you need 
 You will need;
1 roll of wallpaper should be enough or use this wallpaper calculator here.
1 pkt wallpaper paste - mixed as per pack instructions 
Scissors
Stanley knife
Damp cloth 
Some thing to help smooth it out like a medium hard broom brush or paint scrapper

Step 1 prepare paste as per packet instructions

As my wallpaper wasn't a pattern that needed to be lined up I just cut out 4 sheets which was all i needed before starting I did this while waiting for the paste to set. TIP cut the sheets an inch too big its better to be too big and cut it down than too small and have unnecessary join lines or have to start that sheet again and run out off paper. 

Step 2 paint paste onto doors covering all surface area generously

Step 3 smooth on paper first with clean finger tips then with a tool to remove air bubbles
Wipe off any excess glue with clean damp cloth

Step 4 Trim excess with stanley knife

Make sure you use extra care when smoothing the join. Let dry over night.


Then re-hang doors and kiss hubby for all his hard work


close up of the pattern 


site design by designer blogs